lunes, 28 de octubre de 2013
Sequin clutch
My friend Claudia is going to a christening next month and she asked for a cute clutch to wear that day. She wanted something in black with light beige polka dots... I assumed she meant ivory when she said light beige but went looking for anything between ivory and yellow (well, not that much) with no success.
Then I found this beautiful sequin web-like fabric at the party dresses section and got the idea to put it over the beige fabric. And yes, I found lots of colors, but no beige... But they had this beautiful ivory, with a pearly gloss...
I used taffeta in ivory and black with the sequin web/mesh fabric. For interfacing I used sew in hard pellon on the ivory fabric and fusible pellon for the black linning. The pattern I used was the Victoria Clutch from ithinksew without the ruffles (this time the embellishment was the sequin fabric)
Melissa tablet bag
Hi!! Long time no see... Almost two weeks... 13 very long days in fact. I've been sewing some gifts for one of my very dear Australian friends, some bags and designing this little bag.
Melissa will have her seventh birthday this November and Max, her father and my friend is giving her a 7" tablet. He wants it to be a very special gift so my mission was to make it special. Fortunately enough I found this wonderful pink corduroy and everything went on around it.
At first, I haven't considered the fact that I used 1/8" thick foam and got a too small bag. Yes, it was the exact size of the tablet, but getting it inside was next to impossible. So, I had to rip off the name appliquée and the strap and cut everything again... See the original bag on the right.
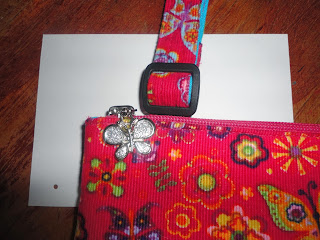
Inspired by the fabric, I finally got to use this beautiful butterfly zipper pulls!! Remember love is in the details!!
Don't you just love this zipper tab?? I wanted to make a recessed zipper, but as I used a 1/4" chain zipper, it was too hard to get inside such a little bag and I had to let it out
I made an adjustable strap, the back side with the same color of the appliquée
The appliquée was a blue canvas strip with Melissa's name embroidered in pink. I don't really know why I used fray check on it, but I did :P
I don't own an embroidery machine, but I got a pretty good deal with a professional embroiderer, one of those guys that makes caps and t-shirts for schools, publicity, etc... And he's good looking too!
 I also made an exterior pocket for Melissa, lined in blue, of course...
The inside of the bag is blue and simple, big enough for the tablet to go inside and padded for protection
Going the extra mile....
When I saw the tablet information I noticed it came with a power charger, usb cable and a pair of earphones, and I went the extra mile and made some matching cable holders...
Any thoughts?? Please, give me your opinion!
Love,
zoolola
martes, 15 de octubre de 2013
Necessary Clutch Wallet with zippered pocket
Based on The Necessary Clutch Wallet pattern from Emmaline Bags.
I only added a zippered pocket on the exterior back of the wallet for loose change... You know, Mexico City can be chaotic and looking for coins at the inside of the wallet might not always be a good idea.
As usual I added the wrist and shoulder straps (see tutorial here)
The exterior was a cotton canvas in strawberry red and white, the inside a polyester blend slate canvas. I also used poplin for the inside pockets in black and light grey...
jueves, 10 de octubre de 2013
My take on The Necessary Clutch Wallet from Emmaline Bags
Update: This four wallets will get raffled on December 3rd (see the details here)
I have made so many Necessary Clutches, but these two are definitely my favorite!!!
Several months ago, my friend Cassandra sent me a link to The Boyd St. Bowling Bag pattern and I loved it as well as all Emmaline patterns!! Having as limited money as I do, I had to choose one and save the others for later (I haven't bought them, but I will... eventually!!). Paulina (yes, you'll read a lot about her) helped me decide and we came up with the decision of buying a wallet pattern since I already own several (I do not have a pattern hoarding problem!!!) bag patterns and none for a wallet. Well, let me tell you, The Necessary Clutch Wallet was the perfect choice for me since it is big, beautiful and versatile. Janelle, its designer, even made a tutorial to add shoulder and wrist straps to it, and I add both for every single NCW I make.
About Janelle Mackay I have to tell you, she's lovely!!! She pays very special attention to her clients and followers, making us feel really special. She also has great free bag making tutorials, including straps, recessed zippers, zippered pockets and regular pockets; all very clear and made easy. In her shop you can find 6 great bag patterns (including the two I already mentioned) and the necessary hardware to make those and every other bag you want. I love her new line of Bag Jewellery, featuring metal bag labels and metal zipper pulls with the legend "handmade"... It's a shame (with exchange rates as they are) I can't aford them right now.
Getting back to the clutches!! The pattern is clear and easy to follow and the results, just lovely. I have made probably two dozen of these, one for me, all the others to sell. So I decided to make four of them for Purse Palooza, two on colors I used before (see below) and two with some really cool new fabrics I found (the two at the top). Yes, and having a flu, this week has been loooong!!
As you can see I love magenta, purple and all the colors on those pallets.
And yes, I always use contrasting fabrics and contrasting thread, even if my stitches are not as straight as I wish... It is a decision I took when making my very first bag, since I'm a loud person and the fabrics I use are not as loud as I am, I just can't help it.
I do have a construction tip for the folding lines. The pattern asks for tracing the lines as part of a triangle with a 3.5" side. Pretty straight forward and well explained in the pattern and the photos; and in theory is a correct way to do it but when no matter how well you try to cut your pieces and how straight are your stitches, if you are like me, you'll get some funny folds, not really straight and uneven. Note in picture below my XOXO pajamas and how the folds are all over the place!!
Instead, i use a clear quilting ruler and mark a line passing by the corner of the stitching box of the zipper pocket at a 60° angle
That way, you will have even folds and if you use a striped fabric, you should get a chevron pattern... Do as I say, not as I do, because you know, it isn't perfect :P
Enough said, I'll leave you with the four babies you came to see, all big and pretty... :D
lunes, 7 de octubre de 2013
Renata's Rol Messenger
Rol is a designer and an architect living in Australia. Some time ago, he asked me for the perfect bag, HIS perfect bag!! And so, he selected the desired features and I came up with a design, the Rol Messenger. I have to say, his bag hasn't been made, I'm waiting for the fabrics (with the coolest dinosaur patterns!!) and I hope to get them in time for purse Palooza.
 |
| I love this little pocket!! |
 To test the pattern I made this first version, with all the features desired by Rol but with Jimena's colors... Jimena is the cousin of my friend Paulina and wanted me to make her a bag ever since she saw the Sideckick Mini Suitcase I made for Paulina. As you can see, even if I used the magenta fabric, all the details are in black. The exterior main fabric is a black denim and the interior fabrics are, both magenta and flowered black, home decor canvas.
I personally didn't like the pen holder, but Jimena and Rol seemed very pleased with it.
To make a long story short, Renata (my sister in law) fell in love with Jimena's bag and I had to make her one. She wanted the same colors and the same bag, but gave me total freedom to change whatever little detail I wanted to change.
First things first; the strap isn't removable and all the details, such as bias trimming and thread, are magenta.
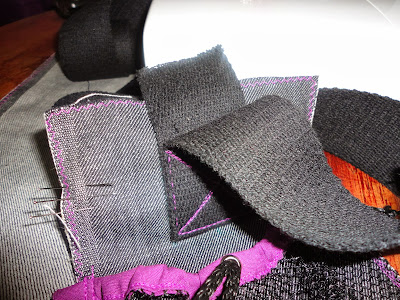
 I can't stress enough the importance of this step!! Do you remember how much weight you used to carry around when in college?? Well, I do!! And I can tell you I broke too many bags back in my day... Most permanent straps are sandwiched between the exterior and the lining while others are fixed with a sewn square to the gusset (very sturdy!!). I just did both!!!
And yes!!! Goodbye ugly pen holder (for now, at least). Hello, beautiful little pen pocket!! This front pocket holds file folders and four different pockets: the big one for cellphones for example, the pen pocket, and two zippered pockets for coins, keys, candy, or anything needing a little safe pocket...
I just can't believe I used to think that recessed zippers were impossible!! It just turns out that they're not only useful, but very simple. I might even consider to make a tutorial one day. Maybe once I get all the rust of my english!!!
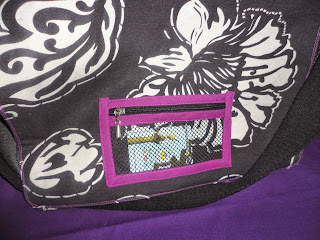
Don't you just love this mesh pocket?? It's perfect for metro cards or id's!!! It's attached to the back of the flap so you can present your card without opening your bag.
This side mesh pocket is different (to the one on Jimena's bag) not only because of the color of the trimming, but because of its "closure". This time, instead of elastic, I used polyester cording and some hardware (I don't know the english name of these "ahorcadores" and "bellotas"). It's just safer, sturdier and prettier!!!
 Finally, a very important feature... The hidden, zippered, fully lined, big pocket that divides the main space of the bag. It also features a double pull zipper. You know for important documents, report cards or stuff like that.
Suscribirse a:
Comentarios (Atom)


